https://codebunny99.tistory.com/163
유튜브 데이터 API를 Postman(포스트맨)으로 사용하는 방법
https://console.cloud.google.com/welcome/new?hl=ko&project=eastern-surface-426200-r0&supportedpurview=project Google 클라우드 플랫폼로그인 Google 클라우드 플랫폼으로 이동accounts.google.com youtube data 검색해서 사용 누르
codebunny99.tistory.com
키(key) 값을 위의 포스팅을 먼저 참고해 가져온다.
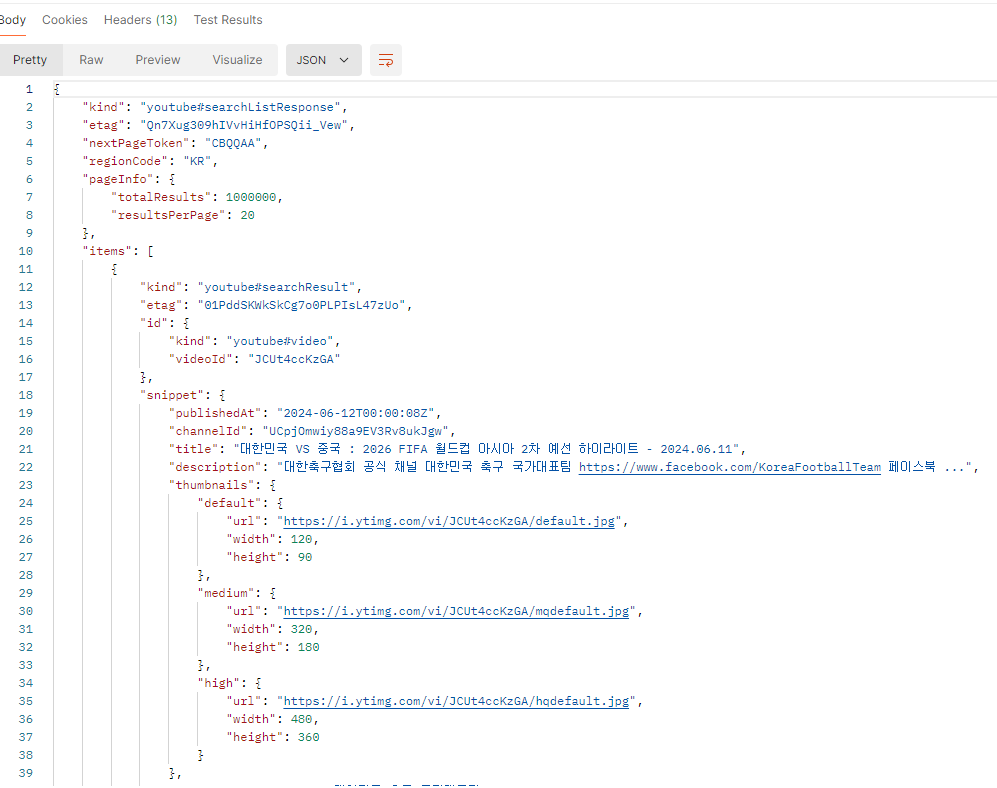
유튜브 API를 Postman으로 실행시키면, 다음과 같이 Json 파일을 준다.
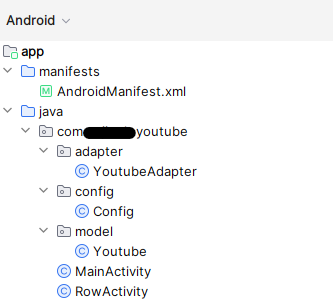
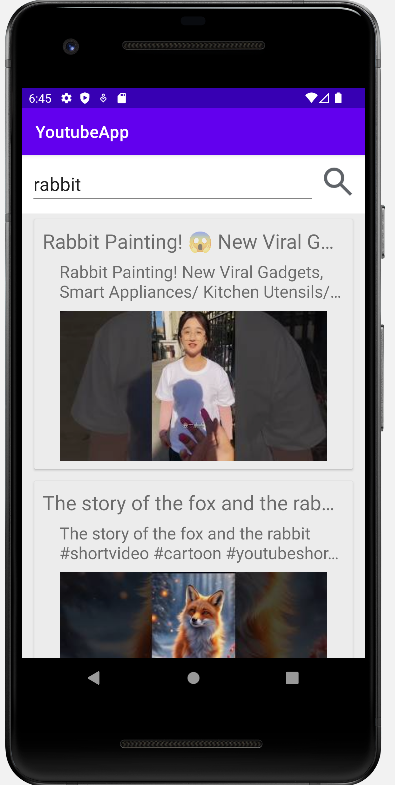
MainActivity
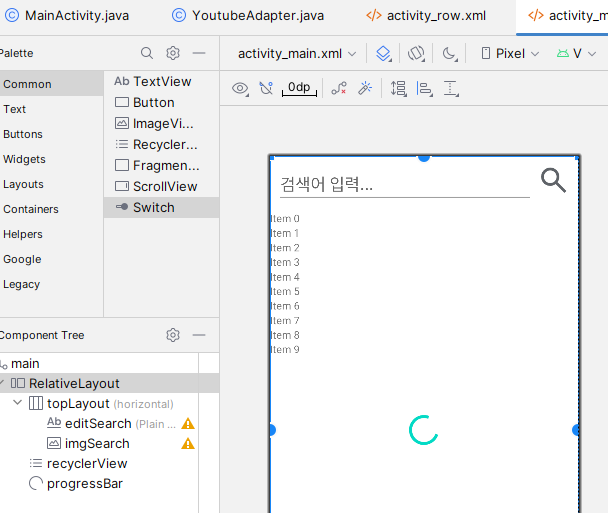
디자인(xml 파일)
<?xml version="1.0" encoding="utf-8"?>
<androidx.constraintlayout.widget.ConstraintLayout xmlns:android="http://schemas.android.com/apk/res/android"
    xmlns:app="http://schemas.android.com/apk/res-auto"
    xmlns:tools="http://schemas.android.com/tools"
    android:id="@+id/main"
    android:layout_width="match_parent"
    android:layout_height="match_parent"
    tools:context=".MainActivity">

    <RelativeLayout
        android:layout_width="match_parent"
        android:layout_height="match_parent"
        app:layout_constraintBottom_toBottomOf="parent"
        app:layout_constraintEnd_toEndOf="parent"
        app:layout_constraintStart_toStartOf="parent"
        app:layout_constraintTop_toTopOf="parent">

        <LinearLayout
            android:id="@+id/topLayout"
            android:layout_width="match_parent"
            android:layout_height="wrap_content"
            android:layout_alignParentTop="true"
            android:layout_margin="10dp"
            android:orientation="horizontal">

            <EditText
                android:id="@+id/editSearch"
                android:layout_width="wrap_content"
                android:layout_height="wrap_content"
                android:layout_marginRight="5dp"
                android:layout_weight="5"
                android:ems="10"
                android:hint="검색어 입력..."
                android:inputType="text"
                android:textSize="22sp" />

            <ImageView
                android:id="@+id/imgSearch"
                android:layout_width="45dp"
                android:layout_height="45dp"
                app:srcCompat="@drawable/search_24dp" />
        </LinearLayout>

        <androidx.recyclerview.widget.RecyclerView
            android:id="@+id/recyclerView"
            android:layout_width="match_parent"
            android:layout_height="match_parent"
            android:layout_below="@id/topLayout" />

        <ProgressBar
            android:id="@+id/progressBar"
            style="?android:attr/progressBarStyle"
            android:layout_width="wrap_content"
            android:layout_height="wrap_content"
            android:layout_centerInParent="true" />
    </RelativeLayout>
</androidx.constraintlayout.widget.ConstraintLayout>
MainActivity.java (파싱하기)
package com.~.youtube;

import android.os.Bundle;
import android.view.View;
import android.widget.EditText;
import android.widget.ImageView;
import android.widget.ProgressBar;
import android.widget.Toast;

import androidx.appcompat.app.AppCompatActivity;
import androidx.recyclerview.widget.LinearLayoutManager;
import androidx.recyclerview.widget.RecyclerView;

import com.android.volley.Request;
import com.android.volley.RequestQueue;
import com.android.volley.Response;
import com.android.volley.VolleyError;
import com.android.volley.toolbox.JsonObjectRequest;
import com.android.volley.toolbox.Volley;
import com.google.android.material.snackbar.Snackbar;
import com.~.youtube.adapter.YoutubeAdapter;
import com.~.youtube.config.Config;
import com.~.youtube.model.Youtube;

import org.json.JSONArray;
import org.json.JSONException;
import org.json.JSONObject;

import java.util.ArrayList;

public class MainActivity extends AppCompatActivity {

    ProgressBar progressBar;
    ImageView imgSearch;
    EditText editSearch;

    // 리사이클러뷰는 관련된 멤버변수 2개 더 작성해야 한다
    RecyclerView recyclerView;
    ArrayList<Youtube> YoutubeArrayList = new ArrayList<>();
    YoutubeAdapter adapter;

    @Override
    protected void onCreate(Bundle savedInstanceState) {
        super.onCreate(savedInstanceState);
        setContentView(R.layout.activity_main);

        getSupportActionBar().setTitle("YoutubeApp");

        // 다음 코드는 쌍으로 무조건 같이 작성
        recyclerView = findViewById(R.id.recyclerView);
        recyclerView.setHasFixedSize(true);
        recyclerView.setLayoutManager(new LinearLayoutManager(MainActivity.this));

        progressBar = findViewById(R.id.progressBar);
        imgSearch = findViewById(R.id.imgSearch);
        editSearch = findViewById(R.id.editSearch);

        // 프로그레스 바를 유저의 눈에서 사라지게 하는 코드
        progressBar.setVisibility(View.GONE);

        imgSearch.setOnClickListener(new View.OnClickListener() {
            @Override
            public void onClick(View v) {
                String keyword = editSearch.getText().toString().trim();

                if(keyword.isEmpty()){
                    Snackbar.make(imgSearch, "검색어를 입력하세요.", Snackbar.LENGTH_SHORT).show();
                    return;
                }

                // 프로그레스 바를 유저의 눈에 보이게 하는 코드
                progressBar.setVisibility(View.VISIBLE);

                // 1. request queue 를 만든다
                RequestQueue queue = Volley.newRequestQueue(MainActivity.this);

                // 2. request(요청)을 만든다.
                // 데이터 타입은, 응답의 json 형식을 보고 결정한다.
                JsonObjectRequest request = new JsonObjectRequest(
                        Request.Method.GET,
                        "https://www.googleapis.com/youtube/v3/search?key=" + Config.YoutubeKey + "&part=snippet&maxResults=20&order=date&q=" + keyword + "&type=video",
                        null,
                        new Response.Listener<JSONObject>() {
                            @Override
                            public void onResponse(JSONObject response) {

                                // 프로그레스 바를 유저의 눈에서 사라지게 하는 코드
                                progressBar.setVisibility(View.GONE);

                                try {
                                    JSONArray items = response.getJSONArray("items");
                                    YoutubeArrayList.clear();  // 기존 데이터 초기화

                                    for (int i = 0; i < items.length(); i++) {
                                        JSONObject data = items.getJSONObject(i);
                                        JSONObject id = data.getJSONObject("id");
                                        String videoId = id.getString("videoId");
                                        JSONObject snippet = data.getJSONObject("snippet");
                                        String title = snippet.getString("title");
                                        String description = snippet.getString("description");

                                        JSONObject thumbnails = snippet.getJSONObject("thumbnails");
                                        JSONObject medium = thumbnails.getJSONObject("medium");
                                        String thumbUrl = medium.getString("url");

                                        JSONObject high = thumbnails.getJSONObject("high");
                                        String url = high.getString("url");

                                        Youtube youtube = new Youtube(videoId, title, description, thumbUrl, url);
                                        YoutubeArrayList.add(youtube);
                                    }

                                    // 어댑터를 만들고
                                    adapter = new YoutubeAdapter(MainActivity.this, YoutubeArrayList);
                                    // 리사이클러뷰에 어댑터를 적용하면 화면에 나온다
                                    recyclerView.setAdapter(adapter);

                                } catch (JSONException e) {
                                    Toast.makeText(MainActivity.this, "파싱 에러", Toast.LENGTH_SHORT).show();
                                    e.printStackTrace();
                                }
                            }
                        },
                        new Response.ErrorListener() {
                            @Override
                            public void onErrorResponse(VolleyError volleyError) {
                                // 프로그레스 바를 유저의 눈에서 사라지게 하는 코드
                                progressBar.setVisibility(View.GONE);

                                Toast.makeText(MainActivity.this, "네트워크 통신 에러", Toast.LENGTH_SHORT).show();
                            }
                        }
                );

                // 3. 네트워크로 보낸다.
                queue.add(request);
            }
        });
    }
}
Config 클래스
package com.~.youtube.config;

public class Config {
    public static final String YoutubeKey = "자신의 키값 입력";

}
Youtube 클래스
package com.~.youtube.model;

import java.io.Serializable;

public class Youtube implements Serializable {

    public String videoId;
    public String thumbUrl;
    public String url;
    public String title;
    public String description;


    public Youtube(){

    }

    public Youtube(String videoId, String title, String description, String thumbUrl, String url) {
        this.videoId = videoId;
        this.thumbUrl = thumbUrl;
        this.url = url;
        this.title = title;
        this.description = description;
    }
}
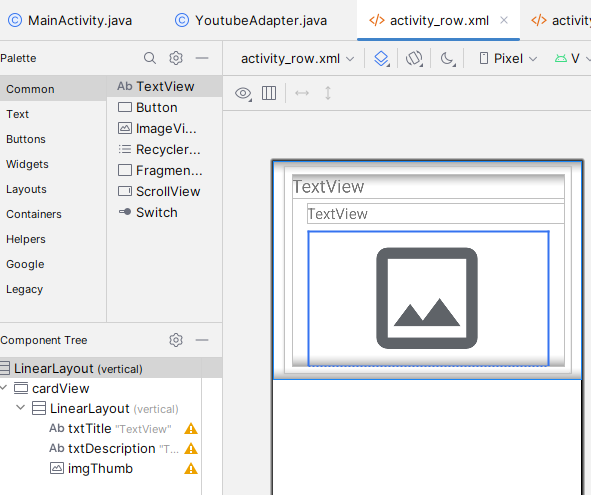
activity_row .xml 만들기
디자인(xml 파일)
<?xml version="1.0" encoding="utf-8"?>
<LinearLayout xmlns:android="http://schemas.android.com/apk/res/android"
    android:layout_width="match_parent"
    android:layout_height="wrap_content"
    android:orientation="vertical">

    <androidx.cardview.widget.CardView
        android:id="@+id/cardView"
        android:layout_width="match_parent"
        android:layout_height="match_parent"
        android:layout_marginLeft="15dp"
        android:layout_marginTop="7dp"
        android:layout_marginRight="15dp"
        android:layout_marginBottom="7dp">

        <LinearLayout
            android:layout_width="match_parent"
            android:layout_height="wrap_content"
            android:layout_margin="10dp"
            android:orientation="vertical">

            <TextView
                android:id="@+id/txtTitle"
                android:layout_width="match_parent"
                android:layout_height="wrap_content"
                android:ellipsize="end"
                android:maxLines="1"
                android:text="TextView"
                android:textSize="24sp" />

            <TextView
                android:id="@+id/txtDescription"
                android:layout_width="match_parent"
                android:layout_height="wrap_content"
                android:layout_marginLeft="20dp"
                android:layout_marginTop="7dp"
                android:layout_marginBottom="10dp"
                android:ellipsize="end"
                android:maxLines="2"
                android:text="TextView"
                android:textSize="20sp" />

            <ImageView
                android:id="@+id/imgThumb"
                android:layout_width="320dp"
                android:layout_height="180dp"
                android:layout_gravity="center"
                android:src="@drawable/image_24dp" />
        </LinearLayout>
    </androidx.cardview.widget.CardView>
</LinearLayout>
Adapter 만들기
package com.~.youtube.adapter;

import android.content.Context;
import android.view.LayoutInflater;
import android.view.View;
import android.view.ViewGroup;
import android.webkit.WebView;
import android.widget.ImageView;
import android.widget.TextView;

import androidx.annotation.NonNull;
import androidx.recyclerview.widget.RecyclerView;

import com.~.youtube.R;
import com.~.youtube.model.Youtube;
import com.bumptech.glide.Glide;

import java.util.ArrayList;

public class YoutubeAdapter extends RecyclerView.Adapter<YoutubeAdapter.ViewHolder>{

    Context context;
    ArrayList<Youtube> YoutubeArrayList;

    public YoutubeAdapter(Context context, ArrayList<Youtube> YoutubeArrayList) {
        this.context = context;
        this.YoutubeArrayList = YoutubeArrayList;
    }

    @NonNull
    @Override
    public ViewHolder onCreateViewHolder(@NonNull ViewGroup parent, int viewType) {
        View view = LayoutInflater.from(parent.getContext())
                .inflate(R.layout.activity_row, parent, false);
        return new YoutubeAdapter.ViewHolder(view);
    }

    @Override
    public void onBindViewHolder(@NonNull ViewHolder holder, int position) {
        Youtube youtube = YoutubeArrayList.get(position);

        holder.txtTitle.setText( youtube.title );
        holder.txtDescription.setText( youtube.description );
        Glide.with(context).load( youtube.thumbUrl ).into( holder.imgThumb );
    }

    @Override
    public int getItemCount() {
        return YoutubeArrayList.size();
    }

    public class ViewHolder extends RecyclerView.ViewHolder {

        TextView txtTitle;
        TextView txtDescription;
        ImageView imgThumb;

        public ViewHolder(@NonNull View itemView) {
            super(itemView);

            txtTitle = itemView.findViewById(R.id.txtTitle);
            txtDescription = itemView.findViewById(R.id.txtDescription);
            imgThumb = itemView.findViewById(R.id.imgThumb);

        }
    }
}
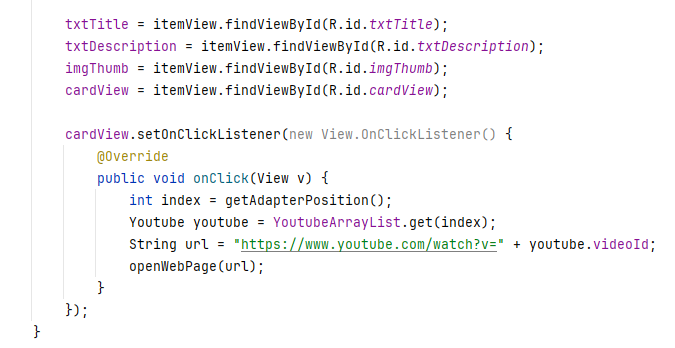
카드뷰 선택하면 유튜브로 이동하게 하기
- Adapter에서 추가한다.
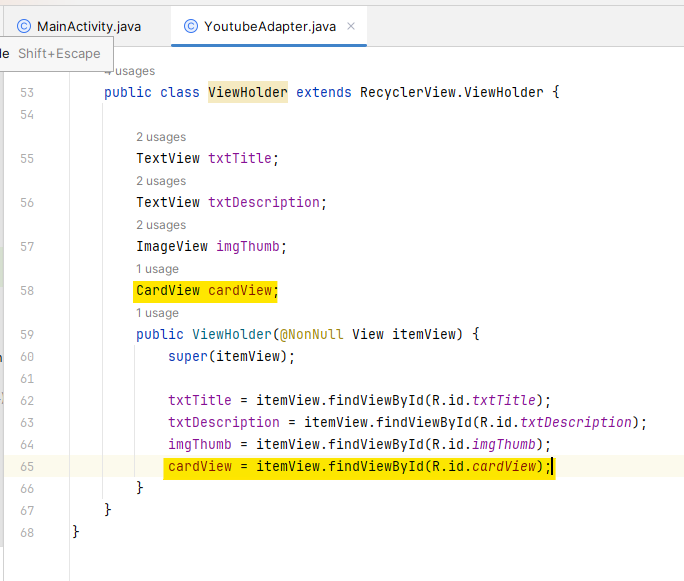
카드뷰를 클릭하면 유튜브로 이동하는 것도 추가해준다.
public class ViewHolder extends RecyclerView.ViewHolder {

        TextView txtTitle;
        TextView txtDescription;
        ImageView imgThumb;
        CardView cardView;

        public ViewHolder(@NonNull View itemView) {
            super(itemView);

            txtTitle = itemView.findViewById(R.id.txtTitle);
            txtDescription = itemView.findViewById(R.id.txtDescription);
            imgThumb = itemView.findViewById(R.id.imgThumb);
            cardView = itemView.findViewById(R.id.cardView);

            cardView.setOnClickListener(new View.OnClickListener() {
                @Override
                public void onClick(View v) {
                    int index = getAdapterPosition();
                    Youtube youtube = YoutubeArrayList.get(index);
                    String url = "https://www.youtube.com/watch?v=" + youtube.videoId;
                    openWebPage(url);
                }
            });
        }

        // 웹브라우저 액티비티를 실행시키는 함수
        void openWebPage(String url){
            Uri uri = Uri.parse(url);
            Intent intent = new Intent(Intent.ACTION_VIEW, uri);
            context.startActivity(intent);
        }
}'Android' 카테고리의 다른 글
| Volley 보다 쉽게 사용 가능한 Retrofit2 라이브러리로 유튜브 app 개발하기 (0) | 2024.06.13 |
|---|---|
| 어플 만들기 : 페이징(스크롤) 처리를 가능하게 하는 코드 작성하기 (0) | 2024.06.12 |
| 다양한 인텐트 Intent (연락처, 웹, 문자, 이메일, 공유) 사용하는 방법 (0) | 2024.06.11 |
| Glide 라이브러리로 이미지 upload 하기 (0) | 2024.06.11 |
| 네트워크를 통해 객체를 주고받기 위한 Serializable(직렬화) (0) | 2024.06.10 |