회원가입 API 생성하기
이메일 형식이 올바른지 확인하기 위해 사용하는 라이브러리 설치
pip install email-validator

pip install passlib

pip install psycopg2-binary
DB와 postman을 연동하는 방법은 아래 글을 참고한다
https://codebunny99.tistory.com/87
MySQL DB를 RestFul API로 GET하기(DB에 있는 데이터 가져오는 API 만들기)
Postman GET의 Request는 Query String(Query Parameters)을 사용한다- offset : 0- limit : 25 DB 설계하기 코드 입력하고 실행하기 (비밀번호 부분 수정해서 입력한다)-- recipe_db 에만 전용으로 접속할 수
codebunny99.tistory.com
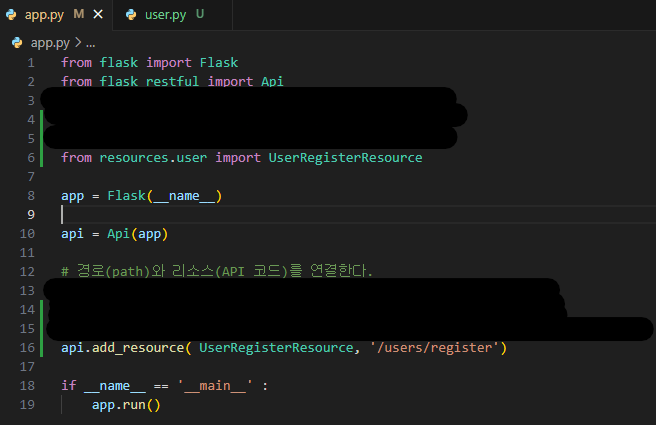
app.py 작성하기
user.py 기본 틀 만들기
from flask import request
from mysql.connector import Error
from flask_restful import Resource  # 상속받기 위해 Resource 임포트한다

class UserRegisterResource(Resource) :

    def post(self):
        return
user.py 작성
from email_validator import EmailNotValidError, validate_email  # 3. 추가
from flask import request
from mysql.connector import Error
from flask_restful import Resource
from mysql_connection import get_connection
from utils import hash_password

class UserRegisterResource(Resource) :

    def post(self):

        # 1. 클라이언트가 보낸 데이터를 받아준다
        data = request.get_json()
        print(data)

        # 2. 데이터가 모두 있는지 확인 - 데이터가 없거나 누락된 경우에는
        # {"result":"fail"} 로 400 bad request로 응담하도록 코드를 작성한다

        # if (data.get('email') is None or data.get('email').strip() == '' or\
        # data.get('username') is None or data.get('username').strip() == '' or\
        # data.get('password' is None or data.get('password').strip() == '')):
        #     return {"result": "fail"}, 400

        # 2-1 있어야 할 컬럼 자체가 없는 경우
        if 'email' not in data or 'username' not in data or 'password' not in data :
            print('error')
            return {"result" : "fail"}, 400

        # 2-2 컬럼은 있지만 데이터가 비어있는 경우 strip은 공백 제거하는 함수이다
        if data['email'].strip() == '' or data['username'].strip() == '' or data['password'].strip() == '' :
            return {"result" : "fail"}, 400

        # 3. 이메일주소 형식이 올바른지 확인한다
        try :
            validate_email(data['email'])
        except EmailNotValidError as e :
            return {'result' : 'fail', 'error' : str(e)}, 400

        # 4. 비밀번호 길이가 유효한지 체크한다 예) 4자리 이상 12자리 이하
        if len(data['password']) < 4 or len(data['password']) > 12 :
            return {'result' : 'fail'}, 400

        # 5. 비밀번호를 암호화한다
        password = hash_password(data['password'])
        print(password)

        # 6. DB에 저장한다
        try :
            ### 1. DB에 연결
            connection = get_connection()
            ### 2. 쿼리문 만들기
            query = '''insert into user
                        (username, email, password)
                        values
                        ( %s , %s , %s);'''
            ### 3. 쿼리에 매칭되는 변수 처리 \
            record = (data['username'],data['email'],password)

            ### 4. 커서를 가져온다
            cursor = connection.cursor()

            ### 5. 쿼리문을 커서로 실행한다
            cursor.execute(query, record)

            ### 6. DB에 완전히 반영하기 위해서는 commit한다 안하면 rollback됨
            connection.commit()

            ### 7. DB에 회원가입하여, user 테이블에 insert된 후 user테이블의 id 값을 가져와야 한다
            user_id = cursor.lastrowid

            ### 8. 자원 해제
            cursor.close()
            connection.close()

        except Error as e :
            if cursor is not None :
                cursor.close()
            if connection is not None :
                connection.close()
            return {'result':'fail'}, 500

        # 7. 응답할 데이터를 JSON으로 만들어서 리턴.
        return { 'result' : 'success' , 'user_id' : user_id } , 200 # 200은 디폴트값이므로 안써도 됨
파일을 저장하여 vscode 터미널 cmd 창에 flask run 한다.

DB에 가서 확인해보기

레시피 리스트를 추가할 때 user_id를 반영하도록 하기
recipe.py의 query문 변경 (user_id 추가)
query = '''insert into recipe
                        (user_id, name, description, num_of_servings, cook_time, directions)
                        values
                        ( %s , %s , %s , %s , %s , %s);'''

record = (data['user_id'],data['name'],data['description'],data['num_of_servings'],data['cook_time'],data['directions'])

DB에 가보면 recipe_db의 recipe 테이블에 user_id가 3으로 추가되었다.

'RestFul API' 카테고리의 다른 글
| JWT(양방향) 암호화 로그인 API 만들기 (0) | 2024.05.22 |
|---|---|
| JWT 암호화(인증토큰) 사용하여 회원가입 API에 적용하기 (0) | 2024.05.22 |
| Hashing 알고리즘 : 단방향 암호화 실행하기 : utils 파일 만들기 (0) | 2024.05.22 |
| Is_publish 컬럼을 update하여 "임시 저장" 기능의 API 만들기 (0) | 2024.05.21 |
| Flask(플라스크)를 사용하여 MySQL DB의 데이터를 삭제(DELETE)하는 API 만들기 (0) | 2024.05.21 |